It is a good idea to learn about R12 to R134a conversion because of how difficult it is to obtain the R12 refrigerant these days and its danger to the environment. Also, buying a new R134a system is a more expensive option.
My guide has a section that describes how to convert from R12 to R134a with a conversion formula. I included an R12 to R134a conversion chart as well.
Answers to frequently asked questions and more will be waiting for you right afterward, so dive in with me!
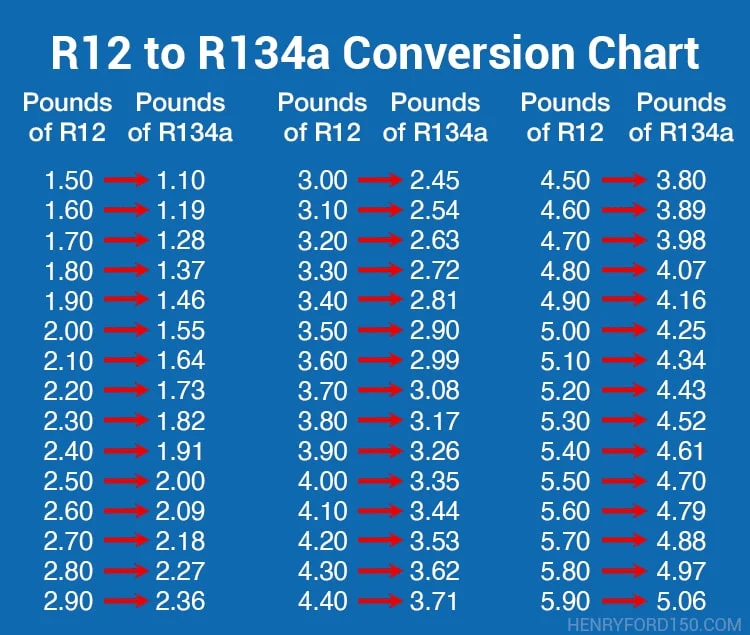
R12 to R134a Conversion Chart
Conversion charts give you the required R134a charge level at a glance. View the tables showing the coolant charge level conversions in ounces and pounds below.
If you need to check R12 to R134a refrigerant charge conversions in ounces, check this chart by Techtown.
R12 to R134a Conversion Formula
Why is the R12-R134a conversion formula necessary?
A conversion formula will be your plan B when you can’t access an R12 to R134a conversion chart. It is important in altering the unit’s charge suitably if you want to retrofit it from R12 to R134a. The volume of Freon12 is heavier than the same measure of Freon134a. This information is crucial in the repair of vehicle AC units. The conversion chart and formula in this guide will help you in retrofitting properly.
It is recommended that you keep the R12 unit’s charge at 75-85 percent for the conversion. Use the formula below to determine the difference in charge level on the condition that no conversion information is available.

Multiply the R12 charge listing by 0.9 if its unit of measurement is pounds. Subtract what you get by 0.25lbs to arrive at the required R134a charge. This is how the calculation will be assuming that the R12 charge listing is 2.5lbs:
Step 1: R134a Charge Level = (R12 Charge Listing × 0.9) – 0.25lbs
Step 2: (2.5lbs × 0.9) – 0.25lbs
Step 3: 2.25lbs – 0.25lbs = 2lbs
The above calculation shows that a Freon12 charge level of 2.5 pounds converts to a Freon134a charge level of 2 pounds.
Read more: Ford 7.3 Gas Problems – Is the 7.3 Gas a Real ‘Godzilla’?
How to Convert R12 to R134a: Step-by-Step
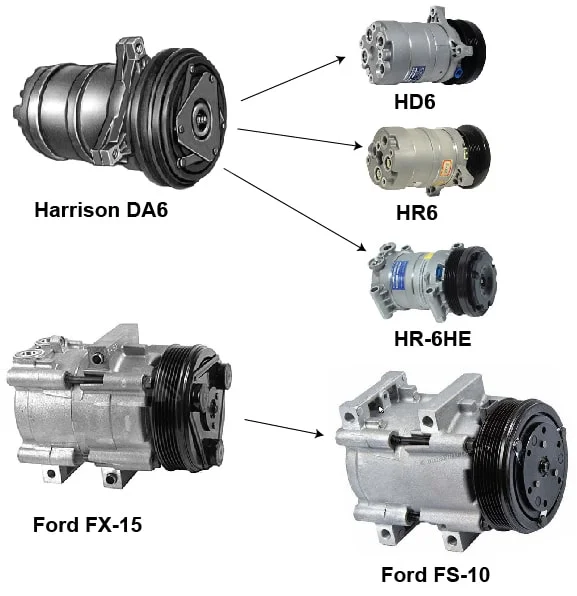
The first step in converting R12 to R134a is to replace the old compressor with an appropriate substitute. This is because R134a intensifies discharge pressure, leading to a rise in compressor workload.
Many old-model compressors can’t adapt to such a change. Vehicles using Ford FX-15 compressors should swap with FS-10 compressors. Harrison DA6 users can switch to an HR-6HE, HD-6, or HR-E.
(Image credit: ricksfreeautorepairadvice.com)
Factory Method
This is the best procedure to follow because it involves swapping out old parts that may have defects like leakages. It will also make the AC perform better than when you implement the easy method. The downside is that the factory method takes more time and is costlier. Expect to pay $250 or more to hire a professional.
Tools
- AC flushing kit
- R134a coolant
- R134a retrofit kit (including a retrofit label, oil port caps, and port adapters)
- R134a pressure switches
- R134a dryer/accumulator
- R134a barrier-style hoses (for vehicles manufactured before the 1990s)
- R134a orifice tube
- Barrier-style HNBR O-ring kit
FOUR UNCLES AC Flush Kit

AC Synthetic R134A Refrigerant

R12 to R134a Refrigerant Kit

Procedure
Step 1: Drain the R12 and keep it for recycling.
Step 2: Clear out mineral oil from the condenser and evaporator using the AC flushing kit.
Step 3: Evacuate mineral oil from the AC high pressure and suction lines.
Step 4: Drain oil from the compressor.
Step 5: Pour the suggested quantity of PAG oil or Ester oil into the evaporator, condenser, and condenser. Whatever oil you use must have optimal viscosity.
Step 6: Replace the high-pressure switch and low-pressure switch.
Step 7: Replace the dryer/accumulator.
Step 8: Substitute the old orifice tube for the new one.
Step 9: Change the old hoses to the R134a barrier-style hoses if the vehicle is a pre-’90s model.
Step 10: Swap out the old O-rings for the HNBR O-rings (barrier-style).
Step 11: Draw a vacuum after attaching the manifold gauge set and vacuum pump. The estimated time for this step is at least 45 minutes.
Step 12: Inspect the system for leaks.
Step 13: Affix the high and low port adapters.
Step 14: Pour Freon134a into the system utilizing the conversion chart or formula given earlier.
Step 15: Affix the port caps.
Step 16: Stick the retrofit label on a visible spot to alert technicians about the R12-R134a conversion in the future.
Easy Method
This is also known as the quick method. It is less complex than the factory method. No wonder it is a cheaper technique. See the tools you need below.
Tools
- R134a pressure switches
- R134a retrofit kit (including a retrofit label, oil port caps, and port adapters)
Procedure
Step 1: Evacuate the Freon12 and store it for recycling.
Step 2: Fill the system with the recommended quantity and viscosity of Ester oil or PAG oil.
Step 3: Replace the high and low-pressure switches with the new ones.
Step 4: Fasten the high and low port adapters.
Step 5: Affix the manifold gauge and vacuum pump, then draw a vacuum for a minimum of 45 minutes
Step 6: Fill the system with Freon134a. Remember to make use of the conversion charts or formula.
Step 7: Fasten the port caps.
Step 8: Place the retrofit label conspicuously on the system for mechanics to know that a Freon134a retrofit was carried out.
Read more: Trailer Running Lights Not Working? Here’re 4 Most Common Reasons & Solutions
R12 to R134a Conversion Kits – Recommendation
You have to purchase an R12 to R134a conversion kit (a.k.a retrofit kit) to aid the conversion process. Be sure that it is a high-standard product so you can get the best results. Check the recommended products below to choose a conversion kit for R12 to R134a.
InterDynamics R12 to R134a Refrigerant Kit (with label)

Aupoko R12 to R134a Retrofit Conversion Adapter Kit

R12 to R134a Conversion Quick Connect Coupler Kit

R12 to R134a Conversion – FAQs
Which Freon Does My F150 Use? R12 or R134a?
All F150 trucks from 2017 to 2022 utilize R1234yf, except the F150 Raptor, whose 2017-2020 model years use Freon134a. R1234yf is also known as 2,3,3,3-Tetrafluoropropene. Every F150 (all Ford vehicles) from the 1999 to 2016 model year uses Freon134a.
How to Determine If Your System Has Been Converted?
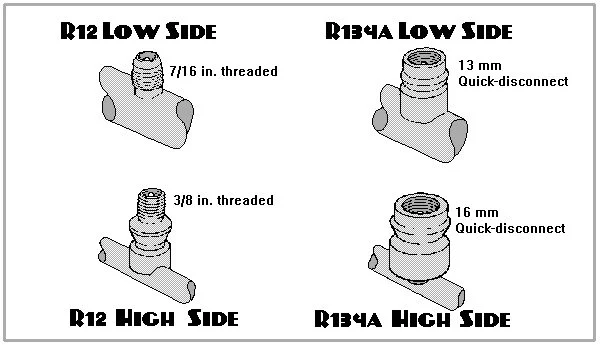
You can be sure about the type of refrigerant system by checking the service port fittings of the system. Seeing quick disconnect fittings means it is an R134a system, while the presence of threaded fittings indicates that it is an R12 system.
When to Perform an R134a Retrofit? And Why?
The matter of an R12 to R134a conversion isn’t just about adapting to the trends but about engaging in eco-friendly practices. You will help to preserve the ozone layer by switching, so adopting R134a NOW is a good thing.
Vehicle owners also perform the retrofit to have a cheaper and more convenient option when purchasing coolant. Retrofitting to R134a refrigerant is inexpensive (affordable conversion kits), and the coolant is easy to obtain. Additionally, the production of R12 has been stopped. So it is difficult to find it these days. And it would be very costly if you are lucky enough to get it. Keep in mind that the cost of getting a new R134a system is $2,000-$4,000, so retrofitting is a more economical approach.
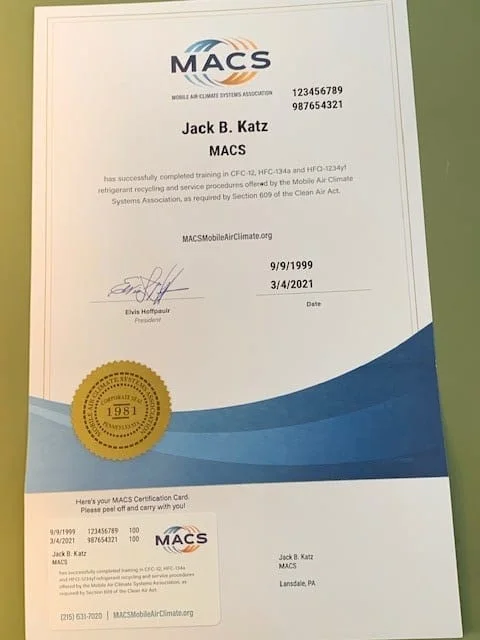
One hassle that can add to your frustration is the request for a 609 EPA license when you purchase Freon12. You will be forced to take your vehicle to a licensed shop if you don’t have the requirement above.
(Image credit: macsmobileairclimate.org)
Is R-134a Retrofit All Good? Here Are 8 Reasons Why You Should Think Twice Before Doing It
The answer is it depends. In other words, it’s not always good. Below are the reasons why you should think twice before deciding to convert from R12 to R134a:
#1 The conversion may reduce the resale value of the vehicle.
#2 The vehicle’s originality will be lost.
#3 It is risky to do an R12-R134a conversion because of the lubricant “PAG oil” R134a has. The PAG oil loses lubrication properties when mixed with even a small amount of Freon12 due to the high chlorine concentration of the latter. So, ensure that you drain Freon12 completely as you convert to Freon134a.
#4 Freon134a is more susceptible to leaks (because of its smaller molecular size) than Freon12.
#5 An R12 system’s heat transfer rate is higher than that of the R134a. An old well-functioning R12 system can blow up to 7 degrees cooler than an old R134a system. The former’s efficiency can be 15% more than the latter.
#6 R12 equipment is typically way smaller than that of R134a. Therefore, the latter’s heat exchangers and compressor must be bigger to perform the same role as the former. An R12 to R134a-retrofit system will possess a lower capacity because of those features. The system may experience higher head pressures, that is, inadequate condenser area.
#7 R134a absorbs more moisture from the air than R12, so it needs tighter connections and seals.
#8 Freon134a systems demand more maintenance than Freon12 systems.
Note: Make sure you hire an honest and diligent professional who will replace all the seals when converting. PAG oil damages Freon12 seals, and this can cause leakages.
Final Thoughts
I hope you guys understand the R12 to R134a conversion procedure. Now, it’s time to consider whether or not converting to R134a is better for your vehicle.
Finally, I have this piece of news that you might be concerned about:
Recently, the EPA has made regulations aimed at phasing out the use of R134a starting from 2021 model year vehicles. R134a has a high global warming potential (GWP), but it is very low compared to R12. Freon134a in the atmosphere is 1,430 times more damaging than carbon dioxide. Recommended replacements include R744, R152a, and R1234yf.
However, be assured that the production of Freon134a is still on. The EPA hasn’t mandated R134A’s discontinuation.
References
https://hvactraining101.com/ac/r12-vs-r134a/
https://www.techtips.ie/Hella-Ireland/aircon-conversion-r12r134a.pdf
https://newoldcars.com/r134-conversion-think-twice-before-you-do-it/
https://ipsnews.net/business/2021/05/08/new-finding-all-you-need-to-know-about-r134a-refrigerant-and-r134a-refrigerant-market/